Feeds:
Posts
Comments

Posts Tagged ‘recipes’


Projects & Recipes

We have been making these Jolly Rancher suckers for years, and if you have little ones they will love making a rainbow.  These are super easy to make and very cool looking.

What you will need:

a bag of Jolly Rancher candies

sucker sticks or coffee stir sticks(that is what we used)

Doing the deed:

Pulled out a cookie sheet, cover it with parchment. Unwrap your Jolly Ranchers and lay 3 in a line.  Mix your colors and flavors some, don’t be shy. Put in and oven on 200 F for 10 minutes or so. They will melt into a stripped pool. Remove from the oven and then lay your stick in each pool.  let them cool completely and enjoy!

A tastey rainbow on a stick.

A tasty rainbow on a stick.

Read Full Post »


Projects & Recipes

Next time you make some double chocolate chip muffins, make them mint.  With your normal muffin mix/recipe, add 1/2 teaspoon of whatever flavoring you would like.  Here is my tried and true double chocolate chip muffin recipe, I make this every week for the kids to have before heading off to school.  To mix it up I added Creme de’ Menthe and they are to die for.

What you will need:

1 & 3/4c. flour

1/2c. sugar

1/4c. coca

1T. baking powder

1/2t. salt

1/2c. chocolate chips

2 eggs

1/2c. veggie or canola oil

1c. milk

1t. of vanilla or any other flavoring you would like

My family all loves the raspberry.

Doing the deed:

Dump everything in a bowl and mix it up until it is smooth and creamy.  Add the chocolate chips last so they don’t all sink to the bottom.  Pour into a muffin pan, filling each lined cup only halfway.  Bake at 350 for 13-14 minutes.  Enjoy!

???????????????????????????????


Read Full Post »


Projects & Recipes

Next time you are making meatloaf, pull out your muffin pan.  The muffin cup size is perfect for 1 serving and if you are serving mashed potatoes with the meatloaf, you can get creative and pipe it on top. Mini meatloaf or dinner cupcake?  Mini meatloaf are a great idea for learning portion control. Happy Noshing.

Just put your meatloaf mix into the cups of a muffin pan.  Bake for 20 minutes on 350.

Just put your meatloaf mix into the cups of a muffin pan. Bake for 20 minutes on 350.

Pop out mini meatloaf.

Pop out mini meatloaf.

Add your sauce & whatever else you enjoy with meatloaf.

Add your sauce & whatever else you enjoy with meatloaf.


Read Full Post »


Projects & Recipes

I have this recipe for delish pumpkin bread that will bring you back to your happy place.  Or better known around here as “crack bread”, it is addicting.  This is a version for a bread machine, which I just love.

What you need:

1 & 1/2C. pumpkin puree – if canned 15oz.

1C. sugar

1 & 1/2t. baking powder

1/2t. baking soda

1/4t. salt

3/4t. cinnamon

1/4t. nutmeg

1/4t. ginger

3C flour


Doing the deed:

First take your bread pan and spray with cooking oil or grease down.  Get out a large bowl and dump all ingredients into it.  Mix as best as you can before you have to go caveman on it with your hands.  At some point you will have to use your hands and knead/mix together thoroughly.  Put dough in your greased bread pan and put in the bread machine.  Set for cake or quick bread.

Here is where things go over the edge for me, I make a glaze to pour on top of the pumpkin bread.  This is an eyeball thing and personal preference as to glaze or not and how thick.  I start with a small bowl, dump in about 1/2c. powder sugar, 1/4t. of vanilla and then milk as needed.  The kids like a super thick glaze that sticks to the bread, so I just work it until I have almost, glue.  How or if you do this step is totally up to you.

Pumpkin bread

Read Full Post »


Projects & Recipes

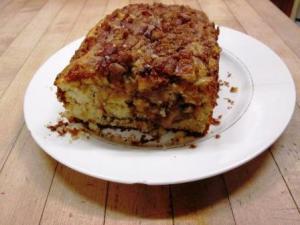
Today I am sharing with you a recipe for some crazy good Apple Cinnamon Bread.  Let me just say that if you try this bread, you really should just make two loaves and save yourself the time later.

What you will need:

1/3C. brown sugar – not packed

1t. ground cinnamon

2/3C. white sugar

1/2C. soft butter

2 eggs

1 & 1/2t/ vanilla

1 & 1/2C. flour

1 & 3/4t. baking powder

1/2C. milk

1 apple, peeled, cored and diced


Doing the deed:

Warm your oven up to 350. Pull out your bread pan and grease, then flour as you would for a cake.  In a small bowl mix together brown sugar and cinnamon, set off to the side.  With your trusty mixer or if you have arms like the Hulk, beat together butter and white sugar until creamy and smooth.  Next beat in your eggs one at a time and then add the vanilla.

In another bowl pour in the flour and baking powder, stir to incorporate the two.  Grab your creamy butter, sugar and egg bowl and slowly stir in your flour mixture.  Add your milk and stir until smooth again.  Take a moment to peel, core and dice up your apple.

Now, pour half your batter into your greased and floured bread pan.  Sprinkle half of your diced apple on batter and top with half of your brown sugar and cinnamon mixture.  Repeat the previous step, so you have two layers in your pan.  On the top layer lightly press your hand on top, this allows the apple to sink into your batter some.  Grab yourself a butter knife and stick it into your batter to the bottom of the pan at one end.  Make a swirling motion toward the other end of the pan and then back again.  Pop into the oven for 30-40 minutes.

*Disclaimer – If you rip the oven door off, due to your home spelling yummy, all damages caused to the oven or the weight you may gain eating the entire loaf is not my fault.

apple bread2

Read Full Post »


Projects & Recipes

If you already make your own laundry soap this is much easier and takes far less room to store. Bonus, it works far better as well.  By chance you are new to making laundry soap, just be happy you get to skip the step of a longer wait and collecting laundry jugs.  I have seen a recipe close to what I use all over the place but I kept close to my base liquid laundry recipe.  There are a few differences to make the laundry butter.

What you will need:

1 bar of Fels Naptha soap

1/4 bar of Dove soap

1C. borax

1C. Washing soda

4C. water

3-1qt mason jars

*optional 1T. preferred essential oil or 1/3C. scented softener laundry crystals (Purex makes a wonderful lavender)

Doing the deed:

In a small bowl dump borax, essential oil or laundry crystals & washing soda, then set off to the side.  Take your bars of soap and chop them up and then toss them in a food processor or you can keep the bars and grate by hand.  Get yourself a large sauce pan and pour in 4 cups of hot water and your soap.  Dissolve over a medium heat, stirring  until all soap bits are totally gone.  Remove from heat and dump in your borax, washing soda and scent mixture into the sauce pan. Stir until all powder is dissolved.  If you are using the laundry crystals, they may not dissolve completely and that is fine trust me, you just don’t want chunks of soap.  Next take 2 of your jars and fill equally, the 3rd you will use later.  The 2 jars should be a bit over half full, top it off with some water up to the curve of the shoulders.  This will give you some head room in the near future.  Twist the caps on tight and invert.  Leave them set upside down for 4 or 5 hours.  Once the time has passed, flip the jars and give them a tap on the bottoms, I gently tap the bottoms on my counter. You will have noticed that the contents of the jar has separated, perfectly normal and what you are looking for.  Pop the caps, careful not to spill and pour out into your mixer or mixing bowl. You will need a spoon to break up and pull out the stiffer layer.  Start mixing on a low speed and move up gradually until it is totally whipped, similar to a whipped butter.  Spoon back into your jars, this is where the 3rd jar will come in. You should have almost 3 full jars of laundry butter.  Next time you wash clothes, ditch all the laundry soap and just add 1 tablespoon of your laundry butter and be amazed.  You should be able to get 190 to 192 loads of laundry out of your 3 jars.  Happy Washing!

If you have this going on, you are on the right track.

If you have this going on, you are on the right track.

It should be the consitancy of whipped butter when you are done & ready to store it.

It should be the consistency of whipped butter when you are done & ready to store it.

I would have had 3 full jars, but my son helped and I now have soap soaked hands.

I would have had 3 full jars, but my son helped and I now have soap soaked hands.

Read Full Post »


Projects & Recipes

We have all learned over the years that a hot cup of Chamomile tea relieves stress and relaxes us. Let’s take that a step further.  A warm bath with Chamomile will do the very same thing as a cup of tea, but with a small twist for you skin.  Here is how I make my Chamomile & Oat bath soak.

What you will need:

3T. loose chamomile

1/2C. instant oatmeal

Doing the deed:

In a jar drop in your chamomile & oats. Shake and you’re done! I used a 100% chamomile tea since there is no other way to get chamomile around me. Run a warm bath and use 1/4 cup of your chamomile & oat mix.  Slip in and relax.

100_4154 100_4158

Read Full Post »


Projects & Recipes

This year before school started I decided I would make a ton of breakfast burritos for the kids to grab out of the freezer.  Last year, we made a ton of breakfast hot pockets and we ran into a few issues.  The main issue was our 12 year old eating them all before anyone else could have one.  This year I cooked everything up so we could make roughly 100 breakfast burritos.  Here is what we did to make mornings simple for us.

The possibilities of what can go in a breakfast burrito are endless. I scrambled up some eggs with peppers, cooked bacon & drained, then diced, hash browns seasoned with red chili's & onions. After cooking, dump everything together into a large pan or bowl, mix up totally. While mixing I added shredded cheese.

The possibilities of what can go in a breakfast burrito are endless. I scrambled up some eggs with peppers, cooked bacon & drained, then diced, hash browns seasoned with red chili’s & onions. After cooking, dump everything together into a large pan or bowl, mix up totally. While mixing I added shredded cheese.

Lay out your tortilla shells and fill, then roll closed. Put on a platter or tray, it goes into the freezer for an hour or so. Transfer into a sealed bag or container to store in the freezer. When needed heat in microwave for 2 minutes and 3 minutes for 2 at a time.

Lay out your tortilla shells and fill, then roll closed. Put on a platter or tray, it goes into the freezer for an hour or so. Transfer into a sealed bag or container to store in the freezer. When needed heat in microwave for 2 minutes and 3 minutes for 2 at a time.


Read Full Post »


Projects & Recipes

After making Monkey Bites for several years for our kids, one of them said, “Hey mom, you should put these on your blog”.  Here I am sharing Monkey Bites with all of you, hope you enjoy them as much as we do.

First thing you do is slice up some bananas and put them in the freezer on a parchment covered tray for about 30 minutes.

First thing you do is slice up some bananas and put them in the freezer on a parchment covered tray for about 30 minutes.

Next is to pull from the freezer and spread a little bit of peanut butter between 2 layers of banana slices. Pop back in the freezer for an hour.

Next is to pull from the freezer and spread a little bit of peanut butter between 2 layers of banana slices. Pop back in the freezer for an hour.

Last, take peanut butter banana sandwiches from the freezer and roll until covered completely, in tempered chocolate. Let chocolate set until firm. Don't worry it only takes a minute for the chocolate to set and then you can start popping the Monkey Bites in your mouth.  Whatever is left, you should store in a sealed bag or air tight container. We store ours in the freezer and will keep for up to 6 months.

Last, take peanut butter banana sandwiches from the freezer and roll until covered completely, in tempered chocolate. Let chocolate set until firm. Don’t worry it only takes a minute for the chocolate to set and then you can start popping the Monkey Bites in your mouth. Whatever is left, you should store in a sealed bag or air tight container. We store ours in the freezer and will keep for up to 6 months.


Read Full Post »


Projects & Recipes

Flower jelly is easy to make and can be made from almost any flower, we used hollyhocks.  Years ago when our home was a functioning elementary school, Peggy a friend up the road, planted hollyhocks in front of the school.  Here we are years later and they are running rampant.  Each year before the buds fall off, I walk through and cut about half into a bowl and leave the rest to seed out for the next year.  The kids and I then take our blooms and turn them into wonderful jelly. Sadly I wasn’t thinking this year when my roses bloomed, and we missed it.  The basic flower jelly recipe is pretty much the same everywhere.

Basic flower jelly

2c. Flower Infusion

1/4c. Lemon Juice

4c. Sugar

1-3oz. Liquid Pectin pkg

Doing the deed

To make a flower infusion if you do not know, is a simple process. Remove the pistol inside& greenery from the outside of the blossom.  You will need 2 cups of flowers to make 2 cups of infusion.  Put your blossoms in a bowl and pour 2 cups of boiling water over them, cover bowl with a lid of some type and let sit overnight.  Strain your liquid from your blossoms and there you have your infusion, the juice.  Don’t be disheartened if you used dark pink and the liquid looks murky and dark.  The color will come back in the following steps.  In a sauce pan pour in your flower infusion, lemon juice and sugar.  Stir over medium heat until you have a boil.  Next add your package of liquid Pectin and stir at a boil for another minute.  Remove from heat and transfer into your canning jars, seal and let cool.  Each flower will produce much different tastes and we have found hollyhock to be excellent.  Wonderful on toast and just as yummy with pork. A little fruity, very sweet and so pretty in the jars.  Next time you walk around your yard or pass a patch of flowers, think of how tastey & beautiful they would look in a jar as jelly.

We used hollyhocks in a range of colors from light pink to dark purple.  My son removed the pollen covered pistols and twisted the green bases off the blossoms.

We used hollyhocks in a range of colors from light pink to dark purple. My son removed the pollen covered pistols and twisted the green bases off the blossoms.

100_4081

If you find, depending on the time you pick your flowers, pollen on the pedals, rinse them off in cool waters.

If you find, depending on the time you pick your flowers, pollen on the pedals, rinse them off in cool waters.

Once you have poured boiling water over your blossoms, make sure to cover with a lid or plastic wrap. Come morning the flowers will be mostly void of color and your water will be much darker.  When you strain the flowers, make sure you press them into the strainer. You will notice a syrup pressed out and that is where the actual flavor of the blossom comes from.

Once you have poured boiling water over your blossoms, make sure to cover with a lid or plastic wrap. Come morning the flowers will be mostly void of color and your water will be much darker. When you strain the flowers, make sure you press them into the strainer. You will notice a syrup pressed out and that is where the actual flavor of the blossom comes from.

When I started my infusion was a dark murky purple. Once the sugar is added and you begin to stir, you will see the true color of your jelly come out.

When I started my infusion was a dark murky purple. Once the sugar is added and you begin to stir, you will see the true color of your jelly come out.

The kids & I made a double batch, ending up with 11 half pinnt jars.

The kids & I made a double batch, ending up with 11 half pint jars.

As you can see by the little eyeballs lurking behind the jars, the moment they are cooled, they will be attacked.  With this in mind, I am glad I started this time of year. Maybe our second blooming I should hide the jelly.

As you can see by the little eyeballs lurking behind the jars, the moment they are cooled, they will be attacked. With this in mind, I am glad I started this time of year. Maybe our second blooming I should hide the jelly.

Read Full Post »

Older Posts »